Creating objects
Creating objects is a very general topic, as objects can be created from
Putting objects of any type stored in a variable back "onto" the image
Using ROIs (think outlines) created programmatically to create annotation or detection objects
Loading objects from a save file
JSON
Java serialization file
Mask image file
 Info: ROIs, objects, the hierarchy
So, lets focus on the basics!
addObjects()
addObject()
Use these two functions to add a list of objects (most common) or a single object into the image. Objects could be annotations or detections, or a combination of both.
all = getAllObjects().findAll{it.isAnnotation() || it.isDetection()}

removeObjects(all, true)
Thread.sleep(1000)
addObjects(all)
Here we get all of the objects in the image, remove them, wait one second, then add them all back in. No harm done. But wait, some harm done! If you had cells within annotations, the hierarchy ordering is now lost. A resolveHierarchy() statement is needed at the end to put cells within the appropriate annotations.
Coding like this allows you to get certain objects "out of the way" while processing the whole image, or, while processing everything else in an image.
For example, using the demo project, if you have both tumor and stroma annotations with cells, you could:
guiscript = true //This line MUST be the first line in the script, no empty space above it.
resolveHierarchy() //let's make sure all of the cells are child objects of their annotations!

tumorAnnos = getAnnotationObjects().findAll{it.getPathClass() == getPathClass("Tumor")}
tumorCells = getCellObjects().findAll{it.getParent().getPathClass() == getPathClass("Tumor")}

//Remove the tumor annotations and their cells

removeObjects(tumorAnnos,false)
removeObjects(tumorCells,false)

//Analyze->Spatial analysis->Detect centroid distances 2D

detectionCentroidDistances(true)

//Add everything back, and make sure the hierarchy is resolved!

addObjects(tumorAnnos)
addObjects(tumorCells)
resolveHierarchy()
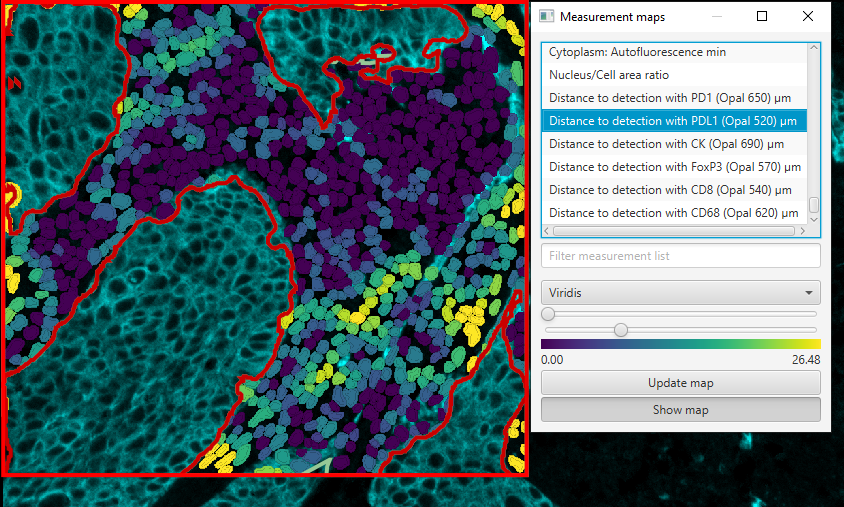
As a result of the script removing cells within the tumor area, none of the cells within the tumor area have distance measurements - resulting in the tumor being visible while the stromal cells showing their masks.
Now if you look at the measurement maps, and scroll down to and select one of the distance measurements, you will find that the distances only take into account cells that are in the stroma. In this way, I could analyze the intracellular distances within a certain compartment, excluding cells outside of that compartment. Whether this is biologically valid really depends on the experiment, so do be careful with what you analyze.
Warning
Creating objects based off of ROIs.
I am only going into this briefly here, but there is a whole world of manipulations you can do with both ROIs and JTS geometries.
If you have an ROI, you can create an annotation or detection object using the following:
rois = getAnnotationObjects().collect{it.getROI()}
newAnnotations = []

rois.each{
    newAnnotations << PathObjects.createAnnotationObject(it, getPathClass("duplicateAnnotation"))
}

addObjects(newAnnotations)
PathObjects.createDetection() can be used to create detections instead of the duplication of annotations we achieved before. One small change to the above script, and we convert our annotations into detections.
rois = getAnnotationObjects().collect{it.getROI()}
newAnnotations = []

rois.each{
    newAnnotations << PathObjects.createDetectionObject(it, getPathClass("duplicateAnnotation"))
}

addObjects(newAnnotations)
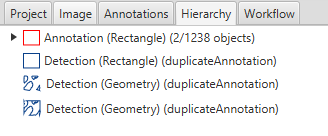
The hierarchy shows that the annotations in the LuCa demo project have been duplicated and added as detections.
newAnnotations is just a variable name, so it can be used just as easily for detections - it would be good practice to rename the variable something more appropriate. It helps you remember what the script was doing later and makes it easier to share the code with others.
Script summary:
Get all of the annotation objects in the image, and from each annotation object, “collect” the ROI of that annotation and add it to the rois list.
Create an empty list to hold your newly created objects
Cycle through all of the ROIs you created in step 1, and use “it” (the current ROI from the list) to create a detection object that has the class “duplicateAnnotation”
The objects were created, but have not yet been added to the hierarchy, so use addObjects() on the list of objects created in step 3. Now your duplicates will show up in the QuPath viewer and the Hierarchy tab.
Creating a specific ROI is a little bit harder, but this script demonstrates how to do that for a rectangle, and is based on Pete's script here.
// Size in pixels at the base resolution
// note that the actual size will be one pixel larger in each dimension

int size = 255

// Get center pixel
def viewer = getCurrentViewer()
int cx = viewer.getCenterPixelX()
int cy = viewer.getCenterPixelY()

// Create & add annotation

def roi = ROIs.createRectangleROI(cx-size/2, cy-size/2, size, size, getCurrentViewer().getImagePlane())

rgb = getColorRGB(150, 150, 150)
pathClass = getPathClass('New Class', rgb)

//Use the line below to change the color after running the script once. You cannot "construct over" an already created class to change the color.
//pathClass.setColor(rgb)

def annotation = PathObjects.createAnnotationObject(roi, pathClass2)
addObject(annotation)
fireHierarchyUpdate()
Note
The above script uses the Viewer (what you see of your slide in the QuPath window) to find the center pixel and uses that as the basis for the new ROI that is created. Remember that you can use describe( getCurrentViewer() ) to find out what sorts of things a viewer object can be used for!
Rectangle ROIs are defined by their upper left corner - so one half of the "size" of the rectangle to be created is subtracted from the centerpoint. This shifts the overall ROI left and up from the center point of the viewer.
def roi = ROIs.createRectangleROI(cx, cy, size, size, getCurrentViewer().getImagePlane())
If the above script were used, without the subtractions, the new rectangle would have it’s upper left corner at the center point of the viewer, rather than having it's center be at the center of the viewer. The next two values (size, size) are the X length and Y length, respectively. Since they are both size in this case, a square will always be generated. Feel free to play around.
Finally, the plane tells you what time point or Z slice the object is on. Usually this will be zero, but for coding, it is best to try to be as inclusive as possible. So, here we use the currently viewed plane.
Info
The rest is the actual creation. A class and color are chosen (yep, you can include the color while "getting" the class), and then the annotation is created, and finally it is added to the hierarchy and shows up in the viewer.
Import and export
The old way of doing this was through Java serializable objects, but for this guide I will start with the newer way of doing things, through the File->Object Data, Import objects or Export as GeoJson.
Exporting and importing this way is exactly how I built the demo project for this guide
Exporting via a script would look something like:
exportAllObjectsToGeoJson("E:\\\Demo\\LuCa-7color_[13860,52919]_1x1component_data.tif - resolution #1.geojson", "FEATURE_COLLECTION")
While importing the same objects back into the current image from that same file would look like:
importObjectsFromFile("E:\\Demo\\LuCa-7color_[13860,52919]_1x1component_data.tif - resolution #1.geojson")
As with most file system interactions, Macs or another OS may require different formatting. Forward slashes may be safer, in general. Though I welcome any feedback on that, I have not tested anything outside of a Windows environment.
Using the file name might be the default, but it is not required.
exportAllObjectsToGeoJson("W:\\QP020M8\\Demo\\Dem Objects.geojson", "FEATURE_COLLECTION")

importObjectsFromFile("W:\\QP020M8\\Demo\\Dem Objects.geojson")
The above code would work in the exact same way. Alternatively, using earlier sections of the guide, you might swap the string image name with a variable.
def name = GeneralTools.getNameWithoutExtension(getCurrentImageData().getServer().getMetadata().getName())

exportAllObjectsToGeoJson("W:\\QP020M8\\Demo\\"+name+".geojson", "FEATURE_COLLECTION")
Other potentially useful examples of object creation
A simple example of creating an ROI based on another ROI - creating the bounding box of an ROI:
//Create some sort of non-rectangular annotation first!

tissue = getAnnotationObjects()[0]

roi = tissue.getROI()

def plane = getCurrentViewer().getImagePlane()

boundingROI = ROIs.createRectangleROI(
            roi.getBoundsX(), //top left corner
            roi.getBoundsY(), //top left corner
            roi.getBoundsWidth(), //width
            roi.getBoundsHeight(), //height
            plane)

boundingAnnotation = PathObjects.createAnnotationObject(boundingROI)

addObject(boundingAnnotation)
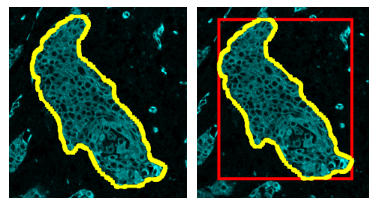
As advertised, a bounding box is generated around an annotation.
Info
Here, the code takes an annotation object (the “first” one it comes across, note the [0]. You might use some sort of logic or a loop if you want to apply it to multiple annotations) and get an ROI for it. The plane can be mostly ignored, but that will tell QuPath what time point or Z step you are currently looking at. Since we are creating a simple bounding rectangle, all I need are to get the bounds, and the width and height of the tissue ROI. The final steps create the annotation, and then add it into QuPath as an object.