Geometries
Geometries are both similar to, and the opposite of, ROIs. While an ROI represents the outline of an area, often by a series of points connected by straight lines, the Geometry represents the area inside.
Hold on to your belt buckles, as the wheels come off easy at this point. When dealing with low level object types such as Geometries, it is very possible to "do bad things" and not know why - so test, test, test! If you are performing a set of operations in a row (say, expand, then check for intersections, then subtract), it may be worth creating objects at each step so you can see the changes.
Manipulating objects like we will do here, by all accounts, should likely not be in an introductory section, and may get moved later as I try to expand what is included on the website. The basic steps are:
Get the stuff you want to modify - be it detections or annotations or whatever.
Get the ROIs for all of those objects.
Get the geometries for each ROI.
Use the Geometry tools in the link above to "do things" to the geometries, such as:
a. intersects (does it? true false)
b. intersection (return the overlap)
c. union (add two geometries together)
d. distance (between the edges of two geometries
e. difference (subtract one geom from another)
f. buffer (increase the size by X pixels, aka dilate)
Add the resulting geometry to a list, or convert it back to an ROI and then an object (annotation or detection) and add that to a list.
Use addObjects() to place a list of objects back into the QuPath hierarchy.
Celebrate and or troubleshoot the code!
 Note
Note
Example 1.
Delete any annotations that do not overlap with a single tissue annotation. This is not really a “modification” of objects, but should serve as a simple introduction to using geometries. Even so, it will get somewhat involved!
//Start here with our baseline "Tissue" class object, all other annotations will be compared to it.

tissueAnnotation = getAnnotationObjects().find{it.getPathClass() == getPathClass("Tissue")}
tissueGeom = tissueAnnotation.getROI().getGeometry()

//Cycle through ALL OTHER annotations to check for intersection
//We do want a list to put all of these into so we are not removing them one at a time (slow!)

toRemove = []

getAnnotationObjects().findAll{it.getPathClass() != getPathClass("Tissue")}.each{anno->
    currentGeom = anno.getROI().getGeometry()
    //Note the ! which means we are looking for NOT intersects
    if ( !currentGeom.intersects(tissueGeom) ){
        //What we need to remove is the annotation, NOT the geometry, which is only the shape of the object
        toRemove << anno
    }
}

//remove the objects that were collected
removeObjects(toRemove,true)
fireHierarchyUpdate()
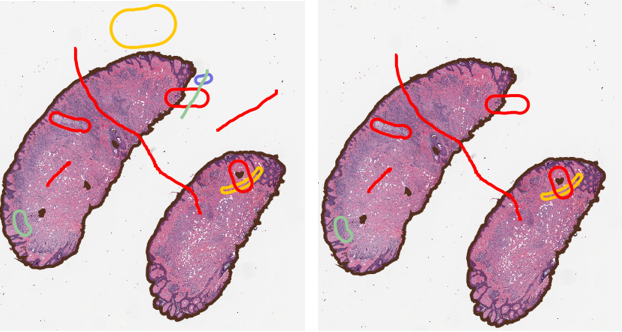
A collection of annotations before running the above script (Left) and after(Right). Any annotation that was not at least touching the tissue annotation has been removed.
You can add any number of other annotations to the image in random locations, including lines, and as long as they do not cross into the tissue annotation they will be removed. If any part of them intersects the tissue, they are retained.
Breakdown:
Define the base object we will work off of, tissueAnnotation. The use of find instead of findAll means that tissueAnnotation will always be a single object.
Create a variable to store the geometry of the tissue.
Create a list to store objects to be removed - see the section on selecting what you want if you do not know why that is important!
Cycle through all annotation objects. While it was not necessary to exclude any other tissue annotations for the example in the demo project, I added the exclusion both because it provides a nice example of how to exclude certain groups of objects, and it is usually best to be explicit about what you want to target. Just because the code “works in your current example” does not mean that the next sample in your pipeline will work exactly the same way.
For each other annotation, get the geometry, and check if it intersects with tissueGeom from step 2. If it does not, add it to the removal list.
Finally, remove all of the objects in the toRemove list.
Example 2.
Subtract two annotations to create a third, new annotation.
Building off of the same structure as before, we will now take the tissue annotation and subtract every other annotation from it. The primary change is that instead of checking "IF" intersects, we want to calculate the difference.
    if ( !currentGeom.intersects(tissueGeom) ){
        //What we need to remove is the annotation, NOT the geometry, which is only the shape of the object
        toRemove << anno
    }
Will be replaced with
tissueGeom = tissueGeom.difference(currentGeom)
If we run the script with only that change, though, nothing will happen! That's because we only altered the geometry, which is a copy of the shape! We would need to create a new annotation based on that geometry in order to have something we can work with or see in QuPath. That means addObjects(), which requires creating a type of object (createAnnotationObject() or createDetectionObject()), which requires an ROI (geometryToROI())!
//Create the new object
tissueROI = GeometryTools.geometryToROI(tissueGeom, ImagePlane.getDefaultPlane())
newTissue = PathObjects.createAnnotationObject( tissueROI, getPathClass("Tissue After Subtraction") )
addObject(newTissue)
fireHierarchyUpdate()
All together, and with a little bit of cleanup -
//Start here with our baseline object, all other annotations will be compared to it.

tissueAnnotation = getAnnotationObjects().find{it.getPathClass() == getPathClass("Tissue")}
tissueGeom = tissueAnnotation.getROI().getGeometry()

//Cycle through ALL OTHER annotations and subtract them from the tissue

getAnnotationObjects().findAll{it.getPathClass() != getPathClass("Tissue")}.each{anno->
    currentGeom = anno.getROI().getGeometry()
    //Note the ! which means we are looking for NOT intersects
    tissueGeom = tissueGeom.difference(currentGeom)
}

//Create the new object
tissueROI = GeometryTools.geometryToROI(tissueGeom, ImagePlane.getDefaultPlane())
newTissue = PathObjects.createAnnotationObject( tissueROI, getPathClass("Tissue After Subtraction") )
addObject(newTissue)

fireHierarchyUpdate()
Subtraction of other annotations from the Tissue annotation. The script was run on the demo project after the previous object removal script, so none of the non-tissue overlapping annotations show up.
Note

Expanding a line annotation (Left and Center) so that the above script will use the expanded annotation to cut the tissue annotation into two pieces (Right).

Zoomed out view showing the line cuts all the way through the tissue annotation.
There are much more complex versions of object modification that can be found on the forum, and they include creating your own cell expansions (can also be used for CellPose!), or creating sequential subtractions or expansions for a zone analysis in tissue.
Example 3.
Here is a variant of the tumor zone analysis that requires a little bit less manual labor - updated now to work on multiple “Tumor” objects, but only one “Tissue” object (classified as such!). The main key is that one annotation of each class is used (though that annotation does not have to be contiguous - mergeSelectedAnnotations() allows multiple Tumor regions to work, and could be applied for the Tissue as well if needed). Instead of chopping into the tumor as in the link above, this script expands outward to interrogate the tumor microenvironment. It also restricts the tumor annotation to the tissue annotation, for cases where the tumor border was not perfectly drawn.
I will not go through all of the details of the script here, but if you have any questions, the forum is the place to ask!
Some improvements were made to the stability of the script thanks to Colt Egelston
/**
0.2.0
 * Script to help with annotating tumor regions, resulting in expansions out from the manually created tumor area (s).
 * Derived from the post at: https://forum.image.sc/t/reduce-annotations/24305/12
 * Here, each of the margin regions is approximately 100 microns in width.
 **************************************************************************
 *When starting this script, have one "Tissue" and one "Tumor" annotation.*
 **************************************************************************
 * @author Pete Bankhead
 * @editor Mike Nelson
 */

//Alternatively, automatically add one or both of the annotations.
//classifier = "Tissue"
//createAnnotationsFromPixelClassifier(classifier, 1000000.0, 0.0)

//-----
// Some things you might want to change

// How much to expand each region
double expandMarginMicrons = 100.0
// How many times you want to chop into your annotation. Edit color script around line 115 if you go over 5
int howManyTimes = 2
// Define the colors
// Inner layers are given scripted colors, but gretaer than 6 or 7 layers may require adjustments
def colorOuterMargin = getColorRGB(0, 200, 0)


// Extract the main info we need
def imageData = getCurrentImageData()
def hierarchy = imageData.getHierarchy()
def server = imageData.getServer()
// We need the pixel size
def cal = server.getPixelCalibration()
if (!cal.hasPixelSizeMicrons()) {
  print 'We need the pixel size information here!'
  return
}


// Choose whether to lock the annotations or not (it's generally a good idea to avoid accidentally moving them)
def lockAnnotations = true
PrecisionModel PM = new PrecisionModel(PrecisionModel.FIXED)
//-----
//Setup - Merge all Tumor objects into one, they can be split later. Get Geometries for each object
selectObjectsByClassification("Tumor")
mergeSelectedAnnotations()
double expandPixels = expandMarginMicrons / cal.getAveragedPixelSizeMicrons()
initialTumorObject = getAnnotationObjects().find{it.getPathClass() == getPathClass("Tumor")}
def tumorGeom = getAnnotationObjects().find{it.getPathClass() == getPathClass("Tumor")}.getROI().getGeometry()
def plane = ImagePlane.getDefaultPlane()
def tissueGeom = getAnnotationObjects().find{it.getPathClass() == getPathClass("Tissue")}.getROI().getGeometry()

//Clean up the Tumor geometry
cleanTumorGeom = tissueGeom.intersection(tumorGeom)
tumorROIClean = GeometryTools.geometryToROI(cleanTumorGeom, plane)


cleanTumor = PathObjects.createAnnotationObject(tumorROIClean, getPathClass("Tumor"))
cleanTumor.setName("CleanTumor")

//Create a list of objects we need to add back in at the end, keep adding to it as we go proceed
annotationsToAdd = []
annotationsToAdd << cleanTumor
/*
addObject(cleanTumor)*/

for (i=0; i<howManyTimes;i++){
    currentArea = annotationsToAdd[annotationsToAdd.size()-1].getROI().getGeometry()
    println(currentArea)
    //Expand from the current area, starting with the tumor
    areaExpansion = currentArea.buffer(expandPixels)
    //Clip off anything outside of the tissue
    areaExpansion = areaExpansion.intersection(tissueGeom)
    //Remove anything that intersects with the tumor
    areaExpansion = areaExpansion.buffer(0)
    areaExpansion = areaExpansion.difference(cleanTumorGeom)
    //If we have already expanded once, include the prevous geometry in the exclusion
    if(i>=1){
            for (k=1; k<=i;k++){
            remove = annotationsToAdd[annotationsToAdd.size()-k].getROI().getGeometry()
            areaExpansion = areaExpansion.difference(remove)

            }
    }
        areaExpansion= GeometryPrecisionReducer.reduce(areaExpansion, PM)
    roiExpansion = GeometryTools.geometryToROI(areaExpansion, plane)
    j = i+1
    int nameValue = j*expandMarginMicrons
    annotationExpansion = PathObjects.createAnnotationObject(roiExpansion, getPathClass(nameValue.toString()))

    annotationExpansion.setName("Margin "+nameValue+" microns")
    annotationExpansion.setColorRGB(getColorRGB(50*j, 40*j, 200-30*j))
    annotationsToAdd << annotationExpansion

}
remainingTissueGeom = tissueGeom.difference(cleanTumorGeom)
annotationsToAdd.each{
    remainingTissueGeom = remainingTissueGeom.difference(it.getROI().getGeometry())
}
remainingTissueROI = GeometryTools.geometryToROI(remainingTissueGeom, plane)
remainingTissue = PathObjects.createAnnotationObject(remainingTissueROI)
remainingTissue.setName("Other Tissue")
remainingTissue.setPathClass(getPathClass("Other Tissue"))
addObject(remainingTissue)

// Add the annotations

addObjects(annotationsToAdd)
removeObject(initialTumorObject, true)
resetSelection()
fireHierarchyUpdate()
println("Done! Wheeeee!")

import org.locationtech.jts.geom.Geometry
import qupath.lib.common.GeneralTools
import qupath.lib.objects.PathObject
import qupath.lib.objects.PathObjects
import qupath.lib.roi.GeometryTools
import qupath.lib.roi.ROIs
import org.locationtech.jts.precision.GeometryPrecisionReducer
import org.locationtech.jts.geom.PrecisionModel
import java.awt.Rectangle
import java.awt.geom.Area
This code can be tested by looking at the upper right part of the CMU loaded data for this section, or anywhere you have an overlapping Tissue and Tumor annotation. Alternatively, edit the script to work with your own classifications.

I have added a second Tumor region for fun and testing here - play with the scripts!

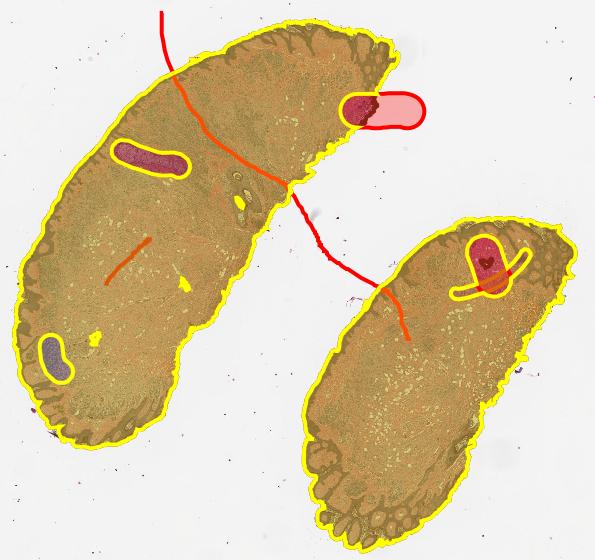
After running the script, the expansions each show up, labeled and colored. Any tumor area outside of the tissue is clipped off, to make manual annotation easier. Even better, the expansions merge if two tumors are close to each other.
Note the removal of the excess annotation from the manually drawn Tumor annotation, and the fact that the border expansions, named by their leading edge distance from the tumor, are restricted to within the Tissue classified annotation. Each expansion is also classified using the expansion distance (100 and 200 in this case) and slightly recolored. Play around with the values indicated at the beginning of the script to achieve different effects.
Other links: Examples of geometries being used in the wild.
Changing object class based on most common edge class - convert small isolated bits into their surrounding class
Calculating shortest distance between objects of different classes.