Classifying objects (and then counting them or doing something related to those classifications) is one of the main reasons we are all using QuPath. And there are already a lot of great options for classification built into QuPath, as shown on the main docs. If you are interested in the pixel classifier, or creating high quality pixel classifier training data, that is covered elsewhere.
https://qupath.readthedocs.io/en/latest/docs/tutorials/cell_classification.html
A quick update about the formatting for classification related code can be found here, containing new options for more easily interacting with the classification system since 0.4.x.
However, there are some times when that guide or the built in options do not quite work for a particular project, and that is part of what I hope to fill in here (thanks to QuPath’s inherent flexibility). I hope to keep updating this page as I see more questions on the forum, so keep the questions coming.
Options described in the link include:
Positive cell detection
The easiest as the classification is built into the cell detection.
If you use the script, you can edit thresholds or values directly, allowing you to iterate without going through the GUI. If you are creating a lot of cells, this may be slow, however.
The Score Compartment only allows you to use the second stain by default, but you can access other stains by converting the image type to Brightfield Other and making sure the Stain Vector names are not Hematoxylin or Residual. These sorts of changes need to be made BEFORE opening the Positive Cell Detection dialog.

The Image type has been changed to Brightfield (other), and the stain vectors have been renamed to “Hematoxylin1” and “Residual1.” Because of those two steps, a new Positive Cell Detection dialog gives all three channels as options for thresholding.
Create single measurement classifier
Also an easy option! Base your classifier on a single measurement, with an above or below threshold class set. If you are using this as part of a multiplex classifier, you will generally only apply an above or below threshold class, not both. Using Negative as the alternative in a multiplex classifier can result in cells with classes like "CD8:Negative:Negative:Negative:CD3" instead of "CD8:CD3".
Set cell intensity classifications (SCIC)
This is where it starts to get fun and complicated. SCIC can be used on its own for a 1+ 2+ 3+ split (or positive/negative if single measurement is chosen), with the default values being 1, 2 and 3 standard deviations above the mean by default (you will almost certainly want to change these). Using SCIC on its own with 3 levels gives you summary values in the parent annotation including the H-Score and Allred values. Even better, though, this analysis can be tacked on to any kind of other classifier.
One example would be creating a complex classifier that includes all cell types except PDL1 - then, running SCIC using the PDL1 channel. The result could be H-scores for each other type of cell in terms of PDL1 expression.

Example output after using setCellIntensityClassifications() on a set of cells that had already been run through a multiplex classifier.
We can look at this and immediately see the strong association with CD68 and FoxP3, and a decent association with PD1.
 Warning
Composite Classifiers
These use multiple classifiers in the order that they are added in the composite menu.
If you want to edit a composite classifier by adjusting one of the component classifiers, you need to overwrite the composite classifier - the change is not automatically passed along.
Single measurement or machine learning classifiers can be used as inputs.
The order is important, especially when doing something like mentioned in (1), as accidentally changing the order will result in differently named cell classifications. “CD8:CD3” is not the same as “CD3:CD8” - at least to the program or most analysis software.
Train object classifier
There is way too much to unpack here, so I am only going to skim some of the highlights.
I like Random Trees because, using the Edit button, you can check Calculate Variable Importance, which will let you look at the actual measurements having the largest impact on your classifier in the View->Show log. I strongly recommend having some sort of validation step for any machine learning classifier, but at least knowing that the classifier is looking at the "right" information is a nice sanity check. If your immune cell classifier is using Cytoplasmic CK: Mean as one of it's primary measurements - you might have some cross-talk or bias in how you are training the classifier!
In the newest version of the object classifier, there is no class balancing (as of 0.3.0), so it is more important than ever to have approximately even numbers of training samples for each class. Preferably from more than one image, using the Load training button!
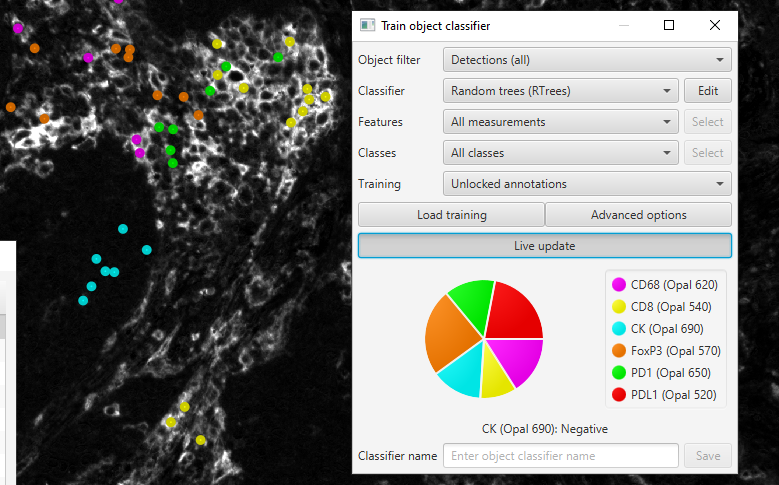
An example of the Train object classifier interface showing class balancing.
Here I should add a few more CD8 cells, most likely, but at least nothing is excessively imbalanced.
3. The machine learning classifier is NOT a Composite classifier. The quality of the classifier shown in 2 is going to be really, really, really bad, because it is exclusive. All PD1, PDL1 double positive cells are only going to be classified as PD1 OR PDL1. Not both.
4. Following on from #3, this is an excellent way to define phenotypes - T cells, B cells, tumor cells, etc. However, it IS exclusive, so if there is a flaw in the phenotypes you are looking for, you will have forced incorrect classifications in some cases. There is no probability threshold below which something will be left as "unknown."
5. There is no fixed number of required objects for training, but in general I prefer to have more objects than there are measurements being used for the classification. Imagine the extreme case of 15 measurements and 2 cells, one marked positive and one marked negative. Almost any of those 15 measurements could be used to differentiate the two cells assuming the measurements were not the exact same. Once you have more than 15 cells, however, it is less likely that the classifier will use a measurement that has bearing on your experiment.
6. Sometimes, the measurement you want does not exist, and you will need to create it. This has been a problem I have often seen with classifiers on the forums or in complaints about classifier functionality in papers. Classifiers will only be as accurate as the measurements you create for them. See this post on cytoplasmic staining.
When all else fails, create your own classifier. Sometimes you may need to do things like classify annotations, or set multiple very specific thresholds for particular events or objects that cannot be handled easily via the single measurement classifier. An example of this can be seen in the paper by Amelie Pulsawadti here. See Figure 7 and scripts in the supplementary materials.
The simplest of these involves recreating the single measurement classifier effect - in this case using the LuCa image.
CKcells = getCellObjects().findAll{ measurement(it, "Cell: CK (Opal 690) mean") > 3}
CKcells.each{ it.setPathClass(getPathClass("CK"))}

fireHierarchyUpdate()

//Updates for 0.5.0 and possibly earlier
for (cell in getCellObjects()) {
    if (cell.measurements.get("Cytoplasm: CK (Opal 690) mean") >4) {
        cell.setClassifications(["CK positive"])
    }
}
Without firing the hierarchy update, the cells will all be correctly classified - but the visualization in the viewer may not change except at certain zoom levels. Briefly summarizing, we took all of the cells, checked each one of them for having a certain measurement with a value greater than 3, and stored that to CKcells. Then, we looped through each member of the CKcells and set the path class to “CK”.
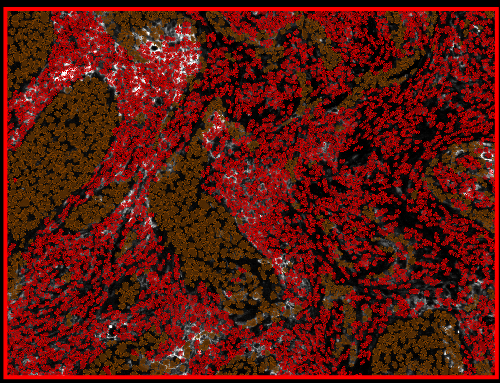
The above script run on the LuCa image in the demo project.
Wait, the color is somewhat random so let's fix that to something a bit more like the CK staining:
CKcells = getCellObjects().findAll{ measurement(it, "Cell: CK (Opal 690) mean") > 3}
CKcells.each{ it.setPathClass(getPathClass("CK"))}
getPathClass("CK").setColor(getColorRGB(0,150,150))

fireHierarchyUpdate()

//Update for 0.5.0 and possibly earlier
CKcells = getCellObjects().findAll{it.measurements.get("Cell: CK (Opal 690) mean") > 3}
CKcells.each{ it.setClassifications(["CK"])}
getPathClass("CK").setColor(0,150,150)

Now the color has been set to something a bit more similar to the default cytokeratin color in the LuCa image.
Alternatively, we could right click in the annotations tab and Populate from existing objects in order to add all current classes to the interface, and then change the color from there.
Now lets build on that bit of code by expanding it to differentiate between large and small CK positive cells.
CKcells = getCellObjects().findAll{ measurement(it, "Cell: CK (Opal 690) mean") > 3}

CKcells.each{
    if(measurement(it, "Cell: Area")>60) {
        it.setPathClass(getPathClass("CK Large"))
    } else { it.setPathClass(getPathClass("CK Small")) }
}
fireHierarchyUpdate()

//Updates for 0.5.0 and possibly earlier
CKcells = getCellObjects().findAll{it.measurements.get("Cell: CK (Opal 690) mean") > 3}

CKcells.each{
    if(measurement(it, "Cell: Area")>60) {
        it.setClassifications(["CK Large"])
    } else { it.setClassifications(["CK Small"]) }
}

This may look different when you run the script, as colors are somewhat random. I ended up with two colors that were almost the exact same, but that gave me a chance to go back to the recoloring code.
At first I thought I might have gotten something wrong, but then I noticed a slight difference in the green shading. This time, I went ahead and added the current classes to the Annotation tab and adjusted the colors there.

Using the Annotation tab interface to adjust the colors manually.

Now the “CK Small” class cells have been recolored purple, and can be more easily distinguished.
Ah, better.
Warning
A more complex classifier
To emulate the scripts in the paper mentioned above, I will create a very shallow manual decision tree as an example.
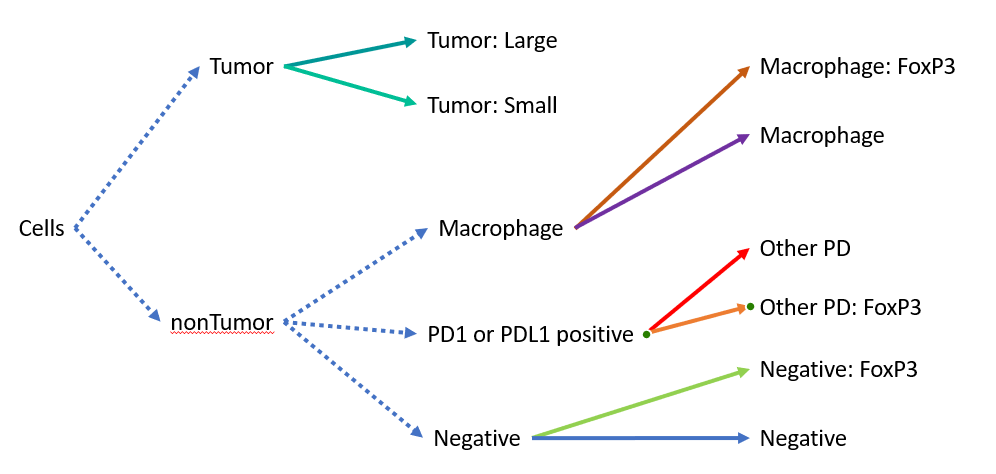
A tentative flow chart for a simple classifier. Hint: the chart is not actually what the code does, can you spot why?
To start with, I want to make sure the classifications are clean, get all of the cell objects to work off of, and I will go ahead and create the classes at the beginning of the script, which allows me to quickly change their names or colors. Right after that, I will list the measurement names and values I want to use for thresholding.
//WARNING - if you have changed the channel names, you will also need to adjust the measurement labels used in each of these scripts.

resetDetectionClassifications()

//Starting from everything
cells = getCellObjects()

//define the classes to use
tumorCl = getPathClass("Tumor")
tumorCl = getPathClass("Tumor")
macrophageCl = getPathClass("Macrophage")
otherPDCl = getPathClass("OtherPD")
macrophageCl.setColor( getColorRGB(165, 0, 255) )
otherPDCl.setColor( getColorRGB(255, 0, 1) )

//measurement labels to use
//keep this near the top so it is easy to adjust in case you want to make changes during the project.
//try to create new scripts and use versioning
//I do this by creating a new Project script, naming it along with a version, and then duplicating the current script into the new file

areaThreshold = 60
area = "Cell: Area"
CD68Threshold = 1.15
CD68 = "Cell: CD68 (Opal 620) mean"
CKThreshold = 2.7
CK = "Cell: CK (Opal 690) mean"
foxP3Threshold = 1.6
foxP3 = "Nucleus: FoxP3 (Opal 570) mean"
PDThreshold = 10
PDL1 = "Cytoplasm: PDL1 (Opal 520) mean"
PD1 = "Cytoplasm: PD1 (Opal 650) mean"

////////////////////////////////////////
//Updated for 0.5.0+ and somewhat earlier
//WARNING - if you have changed the channel names, you will also need to adjust the measurement labels used in each of these scripts.

resetDetectionClassifications()

//Starting from everything
cells = getCellObjects()

//define the classes to use
tumorClass = "Tumor"

macrophageClass = "Macrophage"
otherPDClass = "OtherPD"
getPathClass(macrophageClass).setColor( 165, 0, 255 )
getPathClass(otherPDClass).setColor( 255, 0, 1)

//measurement labels to use
//keep this near the top so it is easy to adjust in case you want to make changes during the project.
//try to create new scripts and use versioning
//I do this by creating a new Project script, naming it along with a version, and then duplicating the current script into the new file

areaThreshold = 60
area = "Cell: Area"
CD68Threshold = 1.15
CD68 = "Cell: CD68 (Opal 620) mean"
CKThreshold = 2.7
CK = "Cell: CK (Opal 690) mean"
foxP3Threshold = 1.6
foxP3 = "Nucleus: FoxP3 (Opal 570) mean"
PDThreshold = 10
PDL1 = "Cytoplasm: PDL1 (Opal 520) mean"
PD1 = "Cytoplasm: PD1 (Opal 650) mean"
This is quite a bit of setup, and very little of it is truly necessary, but it will make life a lot easier later on to have a quick list to check at the top of your script. In addition, if a threshold is used more than once for a deeper tree, only needing to change the variable once at the top of the script is really, really nice!
Realizing that you missed changing a value in one place out of five or six while analyzing the results? Not so nice.
Next, we divide the cells into either tumor or non tumor groups, and assign the Tumor class to the CK positive cells.
//I will start by dividing the cells into Tumor or not Tumor - which I will divide up by size

cells.each{
    if (measurement(it, CK) > CKThreshold) {
        it.setPathClass(tumorCl)
    }
}

//Keep track of which cells are and are not tumor cells
tumorCells = cells.findAll{it.getPathClass() == tumorCl}
notTumorCells = cells.findAll{it.getPathClass() != tumorCl}

//0.5.0
//I will start by dividing the cells into Tumor or not Tumor - which I will divide up by size
cells = getCellObjects()
for (cell in cells){
if (cell.measurements.get(CK) > CKThreshold) {
cell.setClassifications([tumorClass])
}
}

//Keep track of which cells are and are not tumor cells
tumorCells = cells.findAll{it.getClassifications().contains(tumorClass)}
notTumorCells = cells.findAll{!it.getClassifications().contains(tumorClass)}
There are a variety of ways I could have done this, including creating empty lists first and then populating them as the script cycled through cells.each. That would save me running through the cells a second and third time when I create the tumorCells and notTumorCells lists, but the process is quick and this felt easier at the time.
Now to introduce something new, Derived Classes. These are used in the Composite Classifiers, with each derived class separated by a colon and a space. They also show up when setCellIntensityClassifications is used on an already classified object.
//Use getDerivedPathClass() to create a class that has multiple parts.
//Generally this will be the previous parts (it.getPathClass()) plus some new part

tumorCells.each{
    if (measurement(it, area) > areaThreshold) {
        it.setPathClass( getDerivedPathClass(it.getPathClass(), "Large", getColorRGB(0,150,150)) )
    } else { it.setPathClass( getDerivedPathClass(it.getPathClass(), "Small",getColorRGB(0,190,150)) ) }
}
The only change between this method and the normal class assignment is the use of getDerivedPathClass() instead of getPathClass() when creating the class object to pass to setPathClass(). The derived path class requires two parts to stick together, a class and a String name of the new derived class. Optionally, you can stick a color in there with getColorRGB().
Finally, the bulk of the classification is an expansion on the earlier scripts:
//On to the rest

notTumorCells.each{
//Assign macrophages
    if ( measurement(it, CD68) > CD68Threshold ){
        it.setPathClass(macrophageCl)
        //check macrophages for FoxP3
        if( measurement(it, foxP3) > foxP3Threshold ){
            it.setPathClass(  getDerivedPathClass(it.getPathClass(), "FoxP3", getColorRGB(150,75,0)) )
        }
    //Assign non-macrophage PD1 or PDL1 positive cells a class

    } else if ( measurement(it, PDL1) > PDThreshold || measurement(it, PD1) > PDThreshold ){
        it.setPathClass(otherPDCl)
        //Check if each is FoxP3 positive as well

        if( measurement(it, foxP3) > foxP3Threshold ){
            it.setPathClass(  getDerivedPathClass(it.getPathClass(), "FoxP3", getColorRGB(255,150,0)) )
        }
    //Finally, make the cell negative if no other conditions were met

    } else {
        it.setPathClass(getPathClass("Negative"))
        //But check if the otherwise negative cells are FoxP3 positive!

        if( measurement(it, foxP3) > foxP3Threshold ){
            it.setPathClass(  getDerivedPathClass(it.getPathClass(), "FoxP3", getColorRGB(0,250,0)) )
        }
    }
}
fireHierarchyUpdate()
along with firing a hierarchy update to make sure the viewer shows the classes correctly. Put all together, one might think the classifier follows the flow chart above…
But it is important to know that it does not!!
Because of the "if else" statements, the order of the three non-Tumor classes is actually important. For example a Macrophage positive, PDL1 positive cell would show up as "Macrophage" because it would never get to the PD1/PDL1 stage. Alternatively, if we had not used “if else” statements, and simply relied on “if”, that same double positive cell type would only show up as PDL1 positive, since the second step would overwrite the Macrophage step. A more accurate chart might be the following.
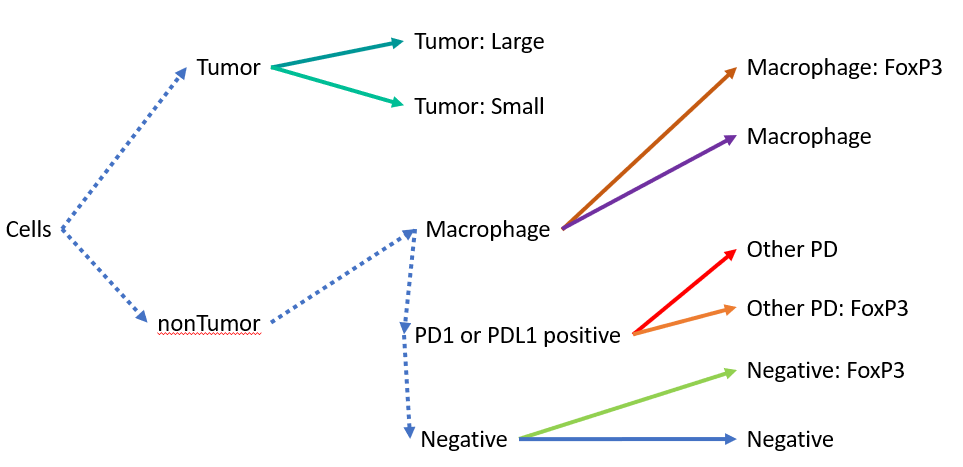
Sloppy copy and paste from PowerPoint of the more accurate flow chart. Thanks PPT for reminding me that nonTumor is not spelled correctly.
Tumor and non-tumor are determined at the same time in a single step, so they are fine. Meanwhile, Macrophage, PD, or Negative status are applied sequentially and rely on different measurements.
Other notes on this flow chart:
It is not possible to have a PD1/PDL1, FoxP3, or CD68 positive Tumor cell; that possibility is never checked.
Similarly, it is not possible to have a PDL1 positive macrophage
However, you will not miss a macrophage due to PDL1 status, due to the ordering.
Most CD8 positive cells are "Negative" since that marker was not used at all.
If a non-tumor cell is surrounded by tumor cells, there is a good chance this classifier would end up assigning it to be a tumor cell, in which case you would never see any intra-tumor immune cells show up in your results.
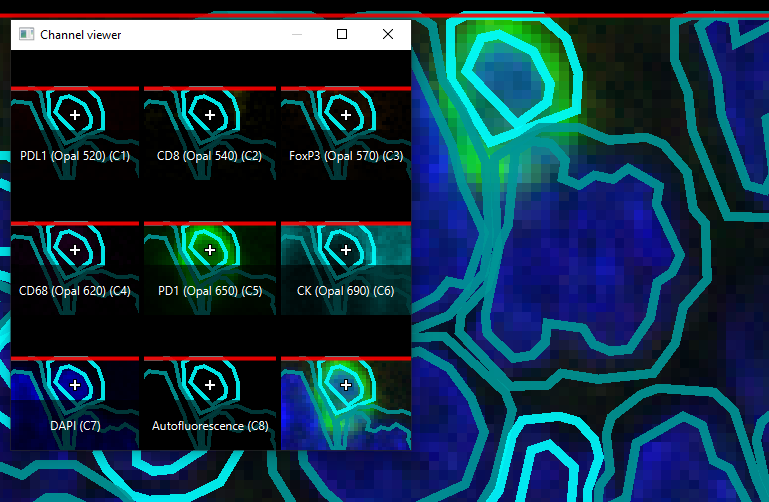
The strongly teal cell in the top center is classified as CK Small, but is very clearly PD1 positive (see channel viewer as a reference for which channel green represents).
The cell in the top middle with the strong PD1 staining is almost certainly not a tumor cell, but because it is surrounded by tumor cells, it is locked into that fate within the classifier. Consistent misclassifications like this one could bias results against immune infiltrated tumor types.
It is as important to know what information you are deliberately skipping as it is to know what you are looking for, if you take this approach! Use with care, and ask questions on the forum.
Specific forum topics
Classifying a subset of cells is another way to guarantee that only one class is applied to a specific cell - no derived or complex classes.
This topic on the forum includes code from Pete to run one classifier on all of your cells, and then each subsequent classifier on only unclassified cells. In this way, the first single-class classifier in a set takes precedence, and each subsequent classifier also "protects" any cells classified by it from being re-classified later.
// Include your classifier names in order
def classifiers = [
    "Classifier 1",
    "Classifier 2"
]

// Reset existing classifications
resetDetectionClassifications()

// Loop through all the classifiers in order
def imageData = getCurrentImageData()
def cells = getCellObjects()
for (name in classifiers) {
    // Just keep the cells that haven't been classified
    cells = cells.findAll {it.getPathClass() == null}
    // Apply the next classifier
    def classifier = loadObjectClassifier(name)
    classifier.classifyObjects(imageData, cells, false)
}
fireHierarchyUpdate()