Scripts and Projects
The default methods of running scripts within QuPath are the "Run" and "Run for Project" options, each of which confines the script to a single image at a time. They are very handy since they take care of a lot of background coding for you, like saving the changes to the image and having easily accessible default assumptions and functions, like getCurrentHierarchy() (“Current” being the image open in the selected viewer, OR, the image Run for Project is currently cycling through!). There are some benefits to ignoring this process, the main one being that you can use objects in different images to affect the currently selected image.
One use of transferring objects around a project is demonstrated in the script here, which takes objects from across a project and combines them into the current image. This can be useful in situations like MICSSS where strip staining is used to generate multiple brightfield images. To a lesser extent, it might be used for sequential slices, though there are problems with sequential slices that scientists do not always appreciate. An even better example is Sara McArdle's script here that generates the affine matrix files for automated alignment within QuPath.
The most important change is probably making sure that you are always working within the data that you think you are working with. If there is no "current" image, you need to be specific, and have some idea about accessing the imageData, the hierarchy, and potentially the server and or metadata.
But, this might all make more sense with a solid example, so let's get started. First, duplicate the CMU-1.svs to be CMU-2.svs by bringing up the context menu for that image in the Project tab, and selecting duplicate. All further scripts will assume you have named this CMU-2.svs.

Creating a duplicate of an image in the project. This does NOT duplicate the image file, so takes up very little additional space
If you run the following script in the CMU image of the demo project, you should get outlines of the tissue in CMU-1.svs.
createAnnotationsFromPixelClassifier("Tissue", 1000000.0, 1000000.0, "SPLIT")
Results of the tissue detection script being run on CMU-1.svs
If not using the demo project, create an annotation some other way, it does not matter what, but also remember to change the file names in any of these scripts if you are not using the CMU-1.svs file!
getProject() accesses the current project, which contains a list of all of the project entries.
getProject().getImageList()
We can cycle through these and access the ones that we are not currently on using
getProject().getImageList().each{
    if( it.getImageName() != getProjectEntry().getImageName() ){
    }
}
getProjectEntry() accesses the current image, and is a quick way to get the current image name. I also do not want to transfer objects into the LuCa image, so I need to make sure we do not use our current image either. Here is what transferring the objects to CMU-2.svs would look like:
getProject().getImageList().each{ entry ->
    if(entry.getImageName() != getProjectEntry().getImageName() && entry.getImageName().contains("CMU")){
        //Standard way of accessing the annotations in the current image
        toTransfer = getAnnotationObjects()
        //We also need to get access to the objects in the destination image, though!
        imageData = entry.readImageData()
        otherHierarchy = imageData.getHierarchy()
        otherHierarchy.addPathObjects(toTransfer)
        entry.saveImageData(imageData)
        print "Objects trasnferred to " + entry.getImageName() + ": "+toTransfer.size()
    } else {print "Not trasferring objects into " + entry.getImageName()}
}
In English:
Cycle through each image.
Check each image name to make sure it is not the current image that is open, and make sure the image name contains some text string. In this case CMU.
Get the annotation objects in the current image.
Access the imageData and then the destination image’s otherHierarchy (objects) so that you have a place to write the annotations from the current image.
Using the other image's hierarchy, add the current image's objects to it.
Save the data for that entry, we need to do this explicitly since we are not running the script for the other image.
I also added some print statements to ensure that we are avoiding images correctly, and to indicate how many objects were transferred. Print statements are a great idea to help with troubleshooting!
Using other functions like getDetectionObjects(), or searches like getDetectionObjects().findAll{}, you could transfer other types of objects or subsets of objects between images.
Functions
Functions are little bundles of code that can be run multiple times in a script. They become handy for longer and more complicated scripts, as you do not have to write out the same code multiple times, and you can change the code in one location and have it affect all places that code is used. However, there are some significant changes required to use functions, and I cannot promise I have figured out all of the kinks.
Definitely read sites by authors with more experience than I if you really want to dig into the details.
Here are a few pointers, though:
You do need to pass objects along so that they will be available if you are doing something to them inside of the function. In some cases you will need to pass the results back, and in some cases you will not.
Basics: Unlike with variables, you need to have at least a "def" in front of the function, if not a type (like int, String, or similar).
x = 5
def printTheNumber(y){
    print y
}
printTheNumber()
This will fail because once you are inside the function, "y" does not have a value, nothing was passed along.
x = 5
def printTheNumber(y){
    print y
}
printTheNumber(x)
The above will print out 5. We send "x" to the function, but the function only knows that it stores whatever is sent to it as "y" and uses that variable. We could have also used "x" within the function, but I wanted to make clear that the variable can be called whatever you want in the function, there is no link. What you pass in the final line is what gets used.
Also, in Groovy, the order of events matters much less - you can generally put your functions at the end of scripts to keep the part that runs clear to the user, and easily accessible.
x = 5
printTheNumber(x)
def printTheNumber(y){
    print y
}
To take this just a little bit further:
for (x=0; x<5; x++){
    printTheNumber(x)
}

def printTheNumber(y){
    print y
}
This will print out the numbers 0-4. However, let's look at one last example before we do something related to QuPath.
x=5
z = printTheNumber(x)

print "Z is " + z
print "Y is " //+ y
print "X is " + x

def printTheNumber(y){
    for (;y!=0 ;y--){
        print y
    }
    return y
}

The function printTheNumber took in x=5, subtracted from it repeatedly, and then returned the changed value which is saved to z. x is unchanged by this process.
Attempting to uncomment the Y line will result in an error; "y" does not exist outside of the function. z is 0 because that is what is returned; the value of y at the end of the function was 0 because y equaling zero broke the for loop. x, however, has never changed.
The value of x was passed to the function, at which point it became y. The main lesson here is that if you want to change a variable, you need to return it! However, you can still DO things while in a function without returning them. Check back on eachWithIndex from the Loops section if you do not remember how it works.
//Code assumes you have a brightfield image and more than one annotation
resetSelection()

getAnnotationObjects().eachWithIndex{annotation,x->
    if (x == 0){ runCellDetection(annotation) }
}

def runCellDetection(annotation){
    getCurrentHierarchy().getSelectionModel().setSelectedObject(annotation, true);
    runPlugin('qupath.imagej.detect.cells.WatershedCellDetection', '{"detectionImageBrightfield": "Hematoxylin OD",  "requestedPixelSizeMicrons": 0.5,  "backgroundRadiusMicrons": 8.0,  "medianRadiusMicrons": 0.0,  "sigmaMicrons": 1.5,  "minAreaMicrons": 10.0,  "maxAreaMicrons": 400.0,  "threshold": 0.1,  "maxBackground": 2.0,  "watershedPostProcess": true,  "cellExpansionMicrons": 5.0,  "includeNuclei": true,  "smoothBoundaries": true,  "makeMeasurements": true}');
}
The first annotation in the list of annotations is where x == 0, and the runCellDetection function is called, passing that annotation along. Once in the function, the annotation is used to select the correct object and run Cell Detection on it. In the demo project, you can either use the CMU ADD OBJECTS.groovy for this section or create a few annotations of your own. Creating a few smaller annotations of your own will probably be faster!
Brain twister time!
If you like, try and figure out what each print statement will generate - 0 or a number of cells.
resetSelection()
def cellCount = 0
getAnnotationObjects().eachWithIndex{annotation,x->
    if (x == 0){ functionCellCount = runCellDetection(annotation) }
}
print "Cell Count outside function: " + cellCount
print "Cell Count returned from Function: " + functionCellCount

def runCellDetection(annotation){
    getCurrentHierarchy().getSelectionModel().setSelectedObject(annotation, true);
    runPlugin('qupath.imagej.detect.cells.WatershedCellDetection', '{"detectionImageBrightfield": "Hematoxylin OD",  "requestedPixelSizeMicrons": 0.5,  "backgroundRadiusMicrons": 8.0,  "medianRadiusMicrons": 0.0,  "sigmaMicrons": 1.5,  "minAreaMicrons": 10.0,  "maxAreaMicrons": 400.0,  "threshold": 0.1,  "maxBackground": 2.0,  "watershedPostProcess": true,  "cellExpansionMicrons": 5.0,  "includeNuclei": true,  "smoothBoundaries": true,  "makeMeasurements": true}');
    cellCount = getDetectionObjects().size()
    print "Cell Count inside function: " + cellCount
    return cellCount
}
Results in something like:

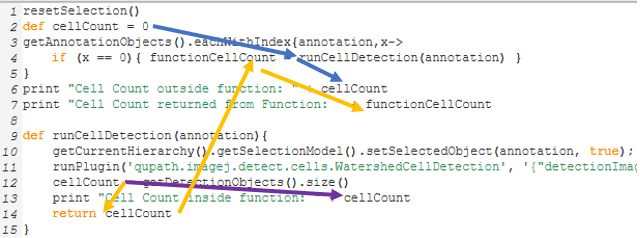
Visual depiction of how certain values are changing through the code. See the descriptions below.
Purple route: The print statement inside the function returns the count of cells because it was just created and is accurate within the function. “cellCount inside function:” was assigned just prior to the print.
Blue route: The first print statement outside the function returns 0, because "def" limited the variable's scope to outside of the function. Outside of the function, cellCount is still 0, even though it changed during the purple route.
Orange route: However, if we return cellCount, and store it in the variable functionCellCount, we can access the number of cells as seen in the third print statement, “Cell Count returned from Function:”.
Hopefully this gets the point across that functions can definitely DO things, but if you are using variables in them, it is best to pass those variables back and forth, and keep track of them. One last more complicated example.
Your values may vary based on how large of annotations you created. Two of them, however, should have been reclassified to Tumor and Stroma, while also having cells created within them.
removeDetections()
def cellCount = 0
functionCellCount = []
cellCountSum = 0

getAnnotationObjects().eachWithIndex{annotation,x->
    if (x == 0 ){ functionCellCount << runCellDetection(annotation, getPathClass("Tumor")) }
    if (x == 1 ){ functionCellCount << runCellDetection(annotation, getPathClass("Stroma")) }
}

print "Cell Count outside function: " + cellCount
print "Cell Count returned from Function: " + functionCellCount
print "Cell Count Sum: " + cellCountSum
resetSelection()

//A function that accepts an annotation and a class
def runCellDetection(annotation, pathClass){
    resetSelection()
    //Make sure only the passed annotation is selected
    getCurrentHierarchy().getSelectionModel().setSelectedObject(annotation, true);
    //And run cell detection
    runPlugin('qupath.imagej.detect.cells.WatershedCellDetection', '{"detectionImageBrightfield": "Hematoxylin OD",  "requestedPixelSizeMicrons": 0.5,  "backgroundRadiusMicrons": 8.0,  "medianRadiusMicrons": 0.0,  "sigmaMicrons": 1.5,  "minAreaMicrons": 10.0,  "maxAreaMicrons": 400.0,  "threshold": 0.1,  "maxBackground": 2.0,  "watershedPostProcess": true,  "cellExpansionMicrons": 5.0,  "includeNuclei": true,  "smoothBoundaries": true,  "makeMeasurements": true}');
    //Set the annotation's class to the class that was passed to the function this time
    annotation.setPathClass(pathClass)
    //find the number of cells within the current annotation
    cellCount = annotation.getChildObjects().size()
    //Add the count to the current sum and then print and return that count
    cellCountSum = cellCountSum+cellCount
    print "Cell Count inside function: " + cellCount

    return cellCount
}

Adding an additional level of complexity, the above script added up the cell counts from two different annotations.
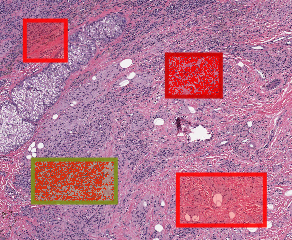
Visual changes within QuPath: top right annotation is slightly darker red, indicating it has been classified as “Tumor” while the lower left annotation is classified as “Stroma”
This script demonstrates that you can alter variables outside of a function IF they are global variables - in this case, shown by not putting "def" in front of the name. def keeps things restricted, which is often a good thing since it will prevent you from changing something by accident. cellCountSum is never passed to the function, but is successfully updated within it.
The expanded script also demonstrates passing multiple variables to a function. If you ever want to return multiple variables from a function, combine them into a list - but keep track of which variable is in which position!
For example:
return [cellCount, cellCountSum]
would return a single list, but with two values. You could access the first pair of values from the first run through the function using functionCellCount[0]. To get the first value within the first list (cellCount when x==0, and the annotation is set to "Tumor"), you would use functionCellCount[0][0], so the first list, and the first position. Alternatively, functionCellCount[0][1] would return the cell count within the “Stroma” annotation.
Try modifying the code yourself to see, and as ever, ask questions on the forum!