Tissue detection (simple thresholder)
Pixel classification (tissue regions)
The official tissue detection and thresholding information can be found here.
While tissue detection can technically be done either using the pixel classifier or the simple thresholder, I will take this opportunity to introduce the thresholder as it tends to be more robust as long as the thresholds are chosen well.
Thresholder interface and creating a thresholder
The interface
Where to find the thresholder
Resolution: As long as your image has pixel size metadata, these values will start with Full for the base resolution to 64X downsample for Very Low. The 64x downsample means your image will be treated as a bunch of squares 64 pixels on a side, with the average value of all of those pixels (in red, green, and blue, for brightfield). Lower resolutions will run faster and can be useful for getting a feel for your chosen channel.
Channel: Choose the channel to Threshold on. For brightfield images I most commonly use Averaged Channels, though the stain vectors can also be useful here. Averaged channels is a measure fo overall stain intensity in that it will be low where there is a lot of staining, and high where there is background. It only matters a little bit what the stain actually is, some stains like DAB absorb/scatter in all three channels and therefor will appear darker in averaged channels.
The key to the channel value is that the Red, Green, Blue, Averaged, Min, and Max channels are all on a 0-255 scale with 0 being black and 255 being white/background. The color deconvolved channels are in the opposite direction, with 0 being white/background, and higher values (say around 3+) being closer to black. For tissue detection, this means using one of the first set of channels will require setting a class for the “Below threshold” class, as that will be the darker part of the image. Conversely, for the color deconvolved channels like Hematoxylin, Residual, or DAB/Eosin, the Above threshold line will be used.
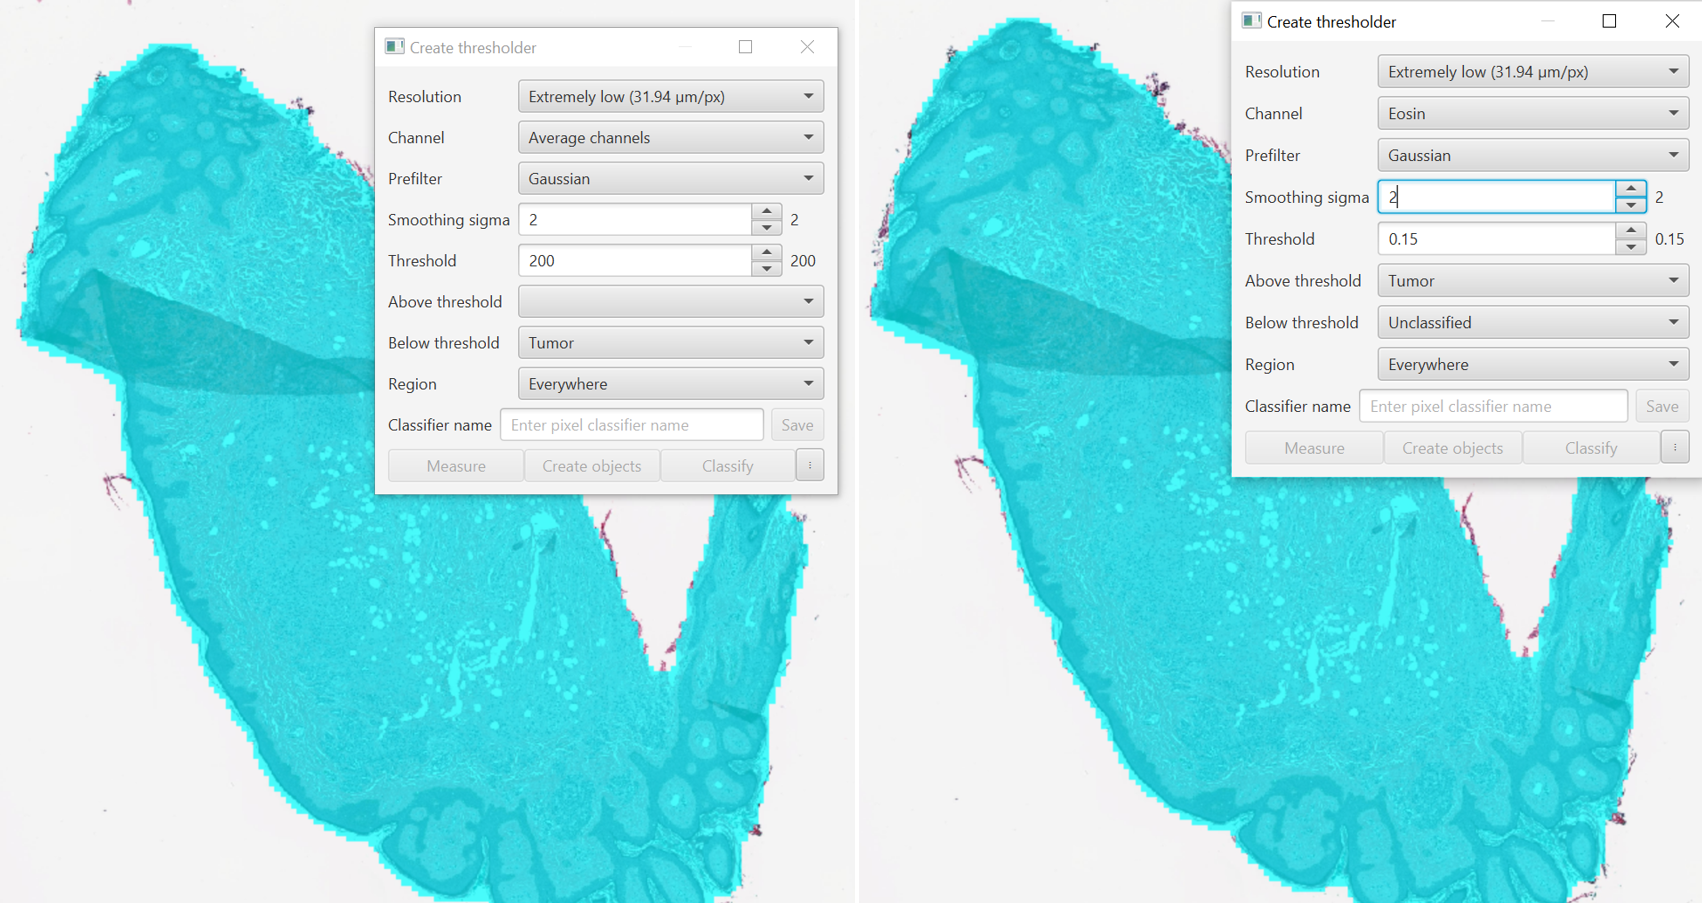
On the left, Averaged channels was selected and a Below threshold value of 200 was used to generate the cyan mask. On the right, the Eosin channel was used, and an Above threshold of 0.15 was selected. The results are very similar. If you are ever confused by the values, use the Brightness and Contrast tool to select the channel of interest and use the mouse to inspect pixels for their values in that channel (lower right of the Viewer).
Prefilter: The majority of the time it will be best to leave this as Gaussian. Essentially, you are applying some sort of blurring or filter to the image prior to thresholding, the size of which is determined in the next Smoothing sigma section. You can try some of the other options, I have occasionally found morphological closing to be useful as well, though usually the same effect can be achieved by excluding holes at the object creation step.
While a Gaussian smoothing would increase the total size of the tissue, Morphological closing both maintains a tight border around the edge of the tissue and fills in adipose cells of increasing size as the Smoothing sigma increases. Play around with these settings to see the effects.
Smoothing sigma: The radius of the Prefilter in pixels of the size selected at the Resolution step. Changing the above image to High resolution (double pixel size) and a Smoothing sigma of 5 (half the radius - of the now double sized pixels) will generate similar, although not exactly the same, results.
An example of Resolution (R) and Smoothing sigma (S) settings.
Top left: R=Extremely low, S = 3. Top center: R=Very low, S=3. Top right: R=Moderate, S=3
Bottom left: R=Very high, S=0. Bottom center: R=Very high, S = 3. Bottom right: R =Very high, S=10.
Threshold: There is very little I can recommend here that was not already covered in earlier steps, so I will only emphasize that you can use the number keys or Brightness&Contrast window to look for good values before you start guessing. This step will likely involve some trial and error, and will be highly sample/scanner/maintenance dependent.
Above and Below threshold: Where do you want to create your objects? If you want an object for the background, include a classification for it, otherwise leave it blank or Unclassified or as Ignore*. I will usually create a new class “Tissue” via the Annotation tab for this step.
Region: Where within the image should the thresholder search? Not really applicable for the purposes of an initial tissue annotation, but can be useful for later thresholding steps. You could exclude black marks at the edge of the slide or from the coverslip in the initial thresholder or pixel classifier, and then look for dark DAB objects only within an already created tissue annotation.
Once the classifier is named and saved, the last three options unlock. You can also enable them without saving the classifier (if you are craaaaaaazy and do not have a project) using the three vertical dots button in the lower right corner. The classifier itself will be saved in the Project folder, within the Classifiers folder, and then within the pixel_classifiers folder.
 Upper and lower bound thresholding (bandpass)
 Update on bandpass
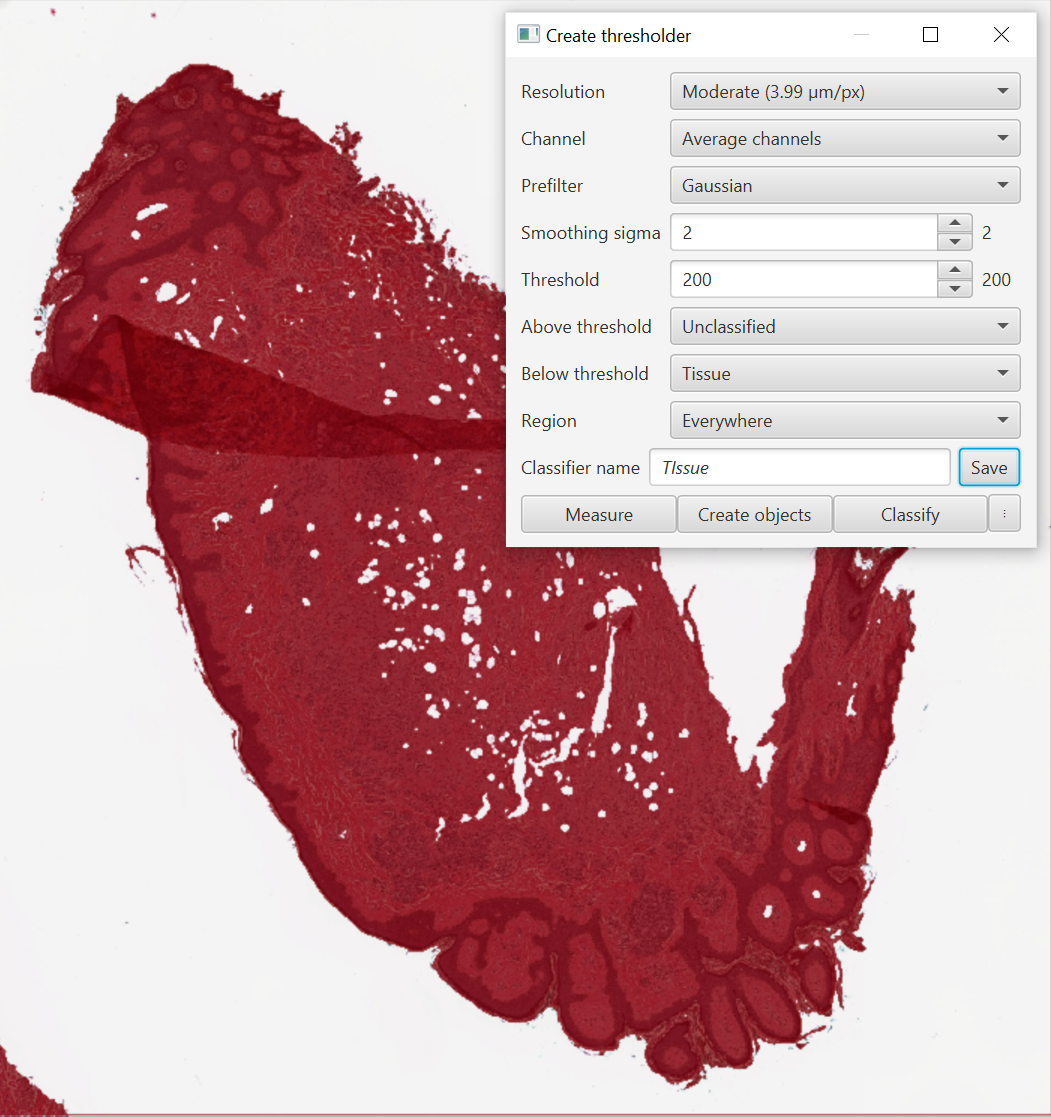
I finally settled on this tissue classifier. Moderate pixel size means it will run fairly quickly even on large tissue slices, a little bit of blur helps overcome small gaps in the tissue, and gives me the option of including or excluding adipose cells or vasculature at a later point.
Ways to use your thresholder
Measure: Measurements can be saved either to individual objects - including cells - or saved to the image itself. Those measurements will be areas and, if more than one class is present, percentages. If you want the percentage of your tissue that is positive for DAB, this is the quickest way to get that.
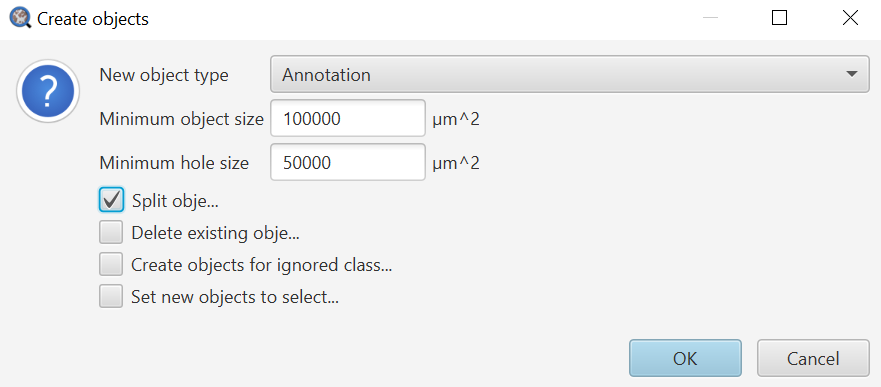
Create objects: Create objects both requires a target to operate on, like Measure, and several settings in the Create objects dialog that is shown (image, right) after selecting an area to operate in. The Create objects dialog allows you to choose whether to make annotations or detections, the Minimum object size (usually in microns unless pixel size information is missing) below which objects will not be created, the Minimum hole size below which holes will be filled in, and several toggles. Increasing the Min object size effectively removes small objects, while increasing the min hole size effectively removes small holes (fills them in).
I usually enable Split objects, which will create one independent object per contiguous outline. Splitting the objects is a great option if you might need to delete one or more created objects at a later point. I will only leave it unchecked in cases where I expect to have distinct pieces of tissue that I need to combine the measurements from.
Delete existing objects does just what it says, and I do not usually use this as I will simply run a clearAllObjects() command prior to the thresholder if I need to do this.
Create objects for ignored classes is a workaround for all classes like Ignore* that contain an asterisk. The asterisk indicates that they should not be used for most things - like generating measurements or objects. Imagine you had a pixel classifier that determined Tumor/Stroma/Background (slide). You would not want your percent tumor to be influenced by the size of the empty/non-tissue scan area, so by using Background* or Ignore* for the background, the resulting percentages would ignore that class. The checkbox gives you a way around this if later you want to create objects for a class that was named using an asterisk.
Set new objects to selected is a nice time saver, enabling you to do something like run a Cell Detection on the just created objects without worrying about adding extra lines to select them. Selecting this is often a good choice, but be aware of how it might impact your downstream analysis.
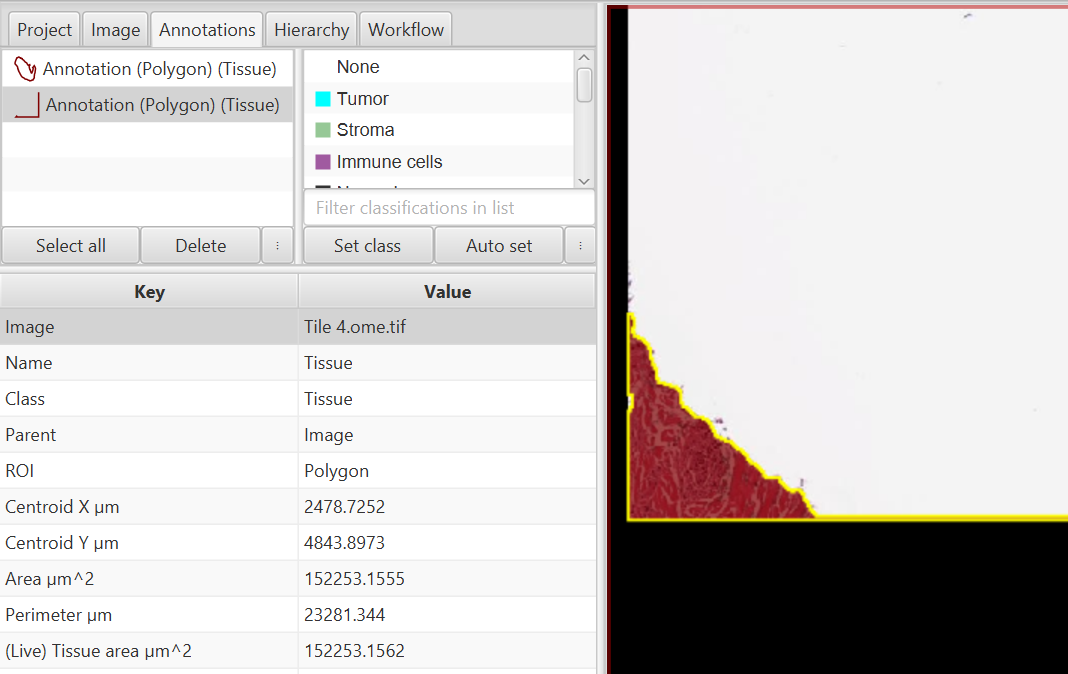
Upon running the Thresholder shown above, I see that two objects are created, not what I wanted! It turns out I will need a slightly higher minimum area threshold to eliminate the little bit of tissue and the edge that connects to it.
To get rid of this second annotation, I will adjust my minimum threshold to higher than 150,000 square microns. Looking at the tissue slice, it is approximately 12 million square microns, so I can certainly afford to bump up the minimum size threshold. I will go with one million square microns as a fairly safe bet, given that I know all of my tissue slices from this set are going to be of similar size. It may be worth noting as a comment at the top of a script that such a size threshold exists, so that anyone else running the script on similar, but smaller, samples might quickly figure out why the script is detecting nothing.
*** I later changed the one million square microns to six million square microns due to the piece of tissue in “Tile 1” that was quite large! A great example of needing to check your results!
Classify: The classify button will classify objects within that portion of the thresholder as the same class as the thresholder itself in that region. I do not usually find this terribly useful for the Thresholder, but it can be very useful with the Pixel Classifier.
Final step: update script
Yet again, we add these steps to the current script. In case I want to run the script multiple times, I will add a clearAllObjects() line at the beginning. With the line clear at the beginning of the script, other users (or yourself in a few months) will realize that any old objects are going to be cleared out, and that they may want to remove that line if there are annotations that need to be left in the image.
Test the script on the other images to assure yourself that it is working.
//This script is currently designed to only detect tissue over 1 million square microns.
//Look at the first number in the createAnnotationsFromPixelClassifier to adjust this behavior

//Remove this line if you need to keep objects that already exist in the image
clearAllObjects()

setImageType('BRIGHTFIELD_H_E');
setColorDeconvolutionStains('{"Name" : "H&E Tile 4", "Stain 1" : "Hematoxylin", "Values 1" : "0.51027 0.76651 0.38998 ", "Stain 2" : "Eosin", "Values 2" : "0.17258 0.79162 0.58613 ", "Background" : " 243 243 243 "}');
createAnnotationsFromPixelClassifier("Tissue", 6000000.0, 50000.0, "SPLIT")


